Infinity stylus
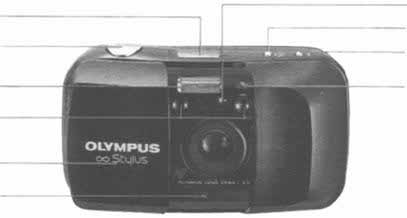
Description of controls
Self-timer button
Shutter release button
Flash mode button
Self-timer signal
Autofocus windows
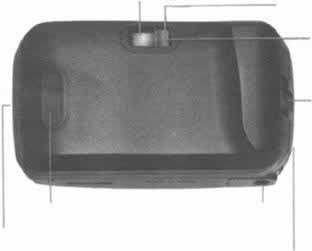
Autofocus indicator
LCD panel
Battery remaining indicator
AUTO/AUTO-S flash
Back cover release
Battery compartment cover
Table of contents
Description of controls. 1
Camera functions and controls. 21
Close-up (Macro) photography. 21
Loading the battery. 5
Simple point & shoot photography . . . . . . . . . . 7
Self-timer photography. 24
Loading the film. 7
Flash AUTO-S mode. 25
Unloading the film. 11
Flash OFF mode. 27
How to take pictures. 13
FILL-IN flash mode . 28
Auto flash photography
Attaching the strap /How to use the soft case. 29
(1) Taking pictures in low light. 18
Auto flash photography
Care and storage. 33
(2) Taking backlighted subjects . 20
Thank you for purchasing the Olympus
Please read this instruction manual carefully before using the camera.
This camera will not operate unless the lens barrier is opened.
We also recommend that you shoot at least one roll of film to familiarize yourself
with the camera's features.
Symbols used in this manual
Order of operation
Automatic operation
Before you
Open the battery compartment cover.
Insert the new battery correctly asindicated below and close the bat-
*Remove the battery if you do not plan to
use the camera for an extended period of
tery compartment cover tightly.
*Use a 3V lithium battery
(Duracell DL123A, Panasonic CR123A,or equivalent.)
Loading the
*Open the battery compartment cover
Open the lens barrier as shown
and remove the battery, as illustrated
below until you hear a "Click"
below, when replacing the battery.
and check the battery power
*Be sure to close the lens barrier when
replacing the battery.
sec.), battery is OK.
battery is low, have spare
continuously, battery
should be replaced immediately.
*When closing the lens barrier, slide
gently to allow the lens to retract as thebarrier is being closed.
Open the back cover by sliding
The camera back will open.
Simple point
the back cover release toward thetop of the camera.
and shoot
designed to use DX
coded 35 mm film to
automatically set filmspeed. If DX-coded
film is unavailable,use ISO 100 film.
Prepare a "DX" film cartridge.
Insert the film cartridge into the
Be sure the film is lying flat.
The camera will set itself auto-
matically for DX-coded film
Avoid direct sunlight when load-
speeds from ISO 50 to 3200.
ing the film.
*When using non-DX film, the film
speed is automatically set to ISO 100.
Align the film leader with the red film loading indicator.
Close the camera back firmly.
*Adjust the length of the film leader before loading so that it matches
(Make sure the back cover lock
with the red loading indicator.
Make sure the film leader tip is not bent and the film perforations areproperly aligned and engaged as shown.
Open the lens barrier until you hear a "Click". Be sure the exposure
* Use the window in the camera back
counter on the LCD panel will display a number "1" indicating the
to check type of film loaded.
first picture on the roll.
* If the film is improperly loaded, the LCD panel will display a blinking "E" as
shown in the illustration (B). In this case, open the back cover, and realign thefilm leader.
The camera automatically rewinds the film when you reach the endof the roll. You will hear the motor operating and the exposurecounter will count down as the film is rewinding.
The final reading on the exposure counter before rewinding may bemore than the number of exposures specified for the film.
If you want to rewind the film before
Open the back cover after the
Remove the film cartridge from
the end of a roll, press the rewind but-
motor has stopped.
the camera in the shade.
ton with the tip of a ballpoint pen.
Do not use any device with a sharp tip
Once the film has been rewound,
and do not press the rewind button too
a blinking "E" will be displayed onthe LCD panel. Further operations are
not possible until the rewound filmcartridge is removed.
Slide the lens barrier as far as it will go until you hear a click.
(The shutter will not release unless the lens barrier is fully open.)When the camera is not in use, always close this barrier so that the
How to take
shutter will not release accidentally. When the lens barrier is opened,normal shooting mode (AUTO or AUTO-S) will be indicated
on the LCD panel. After 4.5 minutes, the LCD will go out.
Hold the camera correctly. Keep your fingers and the strap away from the lens, viewfinder
and flash reflector.
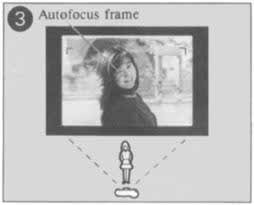
Position your subject within the
Press the shutter release button
The subject should be within the
autofocus frame.
lightly and confirm that the auto-
picture frame.
focus lamp (green) to the rightof the viewfinder is lighted.
*If the distance between the subject and
*If the distance between the subject and
Shooting range: From 0.35 m
the camera is set at 0.35 m (1.1 ft.), the
the camera is less than 0.35 m (1.1 ft.),
(1.1 ft.) to— (infinity)
picture area will be inside the close-up
the autofocus lamp (green) to the right
correction marks as shown in the
of the viewfinder will blink and shutter
will not release.
However, the shutter may sometimes bereleased erroneously when the subjectis extremely close to the camera.
Press the shutter release button
As soon as the shutter is
(Gently to minimize camera
released, the film will automati-
cally advance to the next frame.
You will hear the motor operat-ing. The exposure counter willadvance to the next frame whenfilm winding is completed.
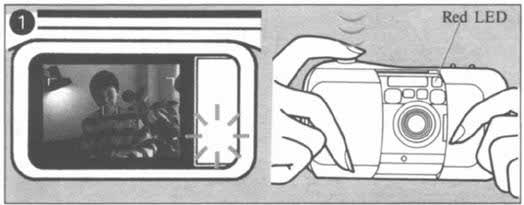
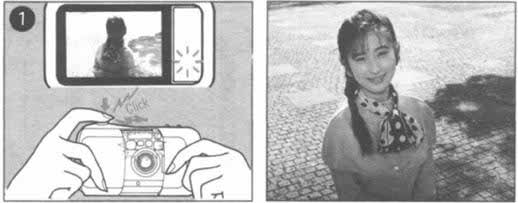
If you are taking pictures in low light, the flash lamp (orange) tothe right of the viewfinder and the red lamp on the front of the camera
Auto flash
will light when the shutter release button is pressed halfway.
•While the flash is still charging and the flash lamp (orange) is blinking,
the shutter will not release.
•It takes about 3 sec. after the film is advanced to recharge the flash
(at normal temperatures).
(1) Taking
pictures in
low light
In low light situations,
the flash will activateautomatically when
the flash mode isAUTO or AUTO-S.

The flash will activate automatically
Flash shooting range:
when the shutter release button is
(ISO 100) 0.35 m (1.1 ft.)—3.5 m (11.5 ft.)
fully pressed.
(ISO 400) 0.35 m (1.1 ft.)—7m (23 ft.)
*The flash range as shown below is optimal
for color negative film. Actual flashworking range for other film typesmay vary.
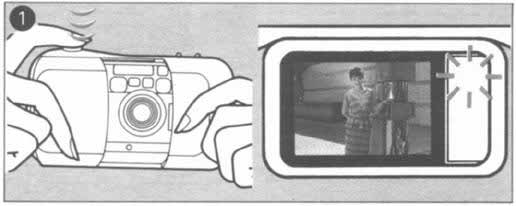
If you are taking backlighted
This indicates that the flash will
subjects, the flash lamp (orange)
Auto flash
and red lamp on the front of
If the backlighted subject is so small
the camera will light when the
that it does not fill the autofocus
shutter release button is pressed
frame, the flash may not activate
automatically. In this case, use theFILL-IN flash mode. (Refer to p. 27)
(2) Taking
In backlighted situations,
the flash will activate
automatically when
the flash mode is
AUTO or AUTO-S.
*When the distance between the subject
* When shooting within the close-up
and the camera is 0.35 m (1.1 ft.), com-
range, to prevent blurred pictures
pose your shot within the close-up
resulting from camera shake, set the
correction marks as shown in the
camera firmly in position (on a tripod,
and controls
for example).
Close-up correction marks
Close-up
photography
Be careful of the flash's
light when shooting
people's faces in close-up photography.
Position your subject in the autofocus frame and press the shutter
release button halfway. The autofocus indicator (green) will light inthe viewfinder.
Focus lock
*When focus is locked, exposure settings are also locked (AE lock).
Use the locus lockwhen you want toposition your subjectoutside the autofocus
frame in the center
of the viewfinder.

While keeping the shutter release
Press the shutter release button
button pressed halfway, change
fully to take the picture.
the position of your subject in
*If you remove your finger from
the viewfinder to achieve the
the shutter release button while
the autofocus indicator (green) lights,the focus lock will be canceled.
While pressing the self-timer button
press the shutter release
activate the self-timer. The shutter will be
released 12 seconds later
*Be sure the subject is in the autofocus frame.
*The red lamp on the front of the camera will light up for the first 10 seconds,
then blink rapidly for 2 seconds until the shutter is released. To cancel theself-timer, close the lens barrier or press the
button again.
*After the shutter is released, the self-timer mode will be automatically canceled.
Press the flash mode button
Compose your shot and press
until " AUTO-S" appears on the
the shutter release button — the
flash will emit a rapid series of
pre flashes, followed directly bythe main flash.
Auto-S flash
Hold the camera firmly while pressing
the shutter release button.
Auto-S flash significantly
reduces "Red-eye"phenomenon (when a
subject's eyes appear red)in flash portraits andgroup photos.
Flash AUTO-S mode shooting range:
Press the flash mode button
(ISO 100) 0.35 m (1.1 ft.) —3.5 m (11.5 ft.)
until " OFF" appears on the
(ISO 400) 0.35 m —7 m (23 ft.)
*To cancel Auto-S mode, press the flash
mode button again.
*In low lighting condition, the shutter
speed may be slow. Use a tripod or
* Auto-S mode will not be canceled, when
the lens barrier is closed.
other camera support to prevent the
effects of camera shake.
This mode is to be used
in situations where a
flash is prohibited(as in museums) or
(for special effects).
Press the shutter release button
*With backlighting the subject may be
fully to take the picture.
*To cancel flash OFF mode press the
flash mode button again or close the
lens barrier.
flash mode
The flash alwaysactivates in this mode.
It can be engagedfor daylight synchrophotography or when
shooting backlighted
*By using the flash FILL-IN mode, the
Press the flash mode button until
Press the shutter release button
subject will be properly lit by the flash.
" FILL-IN"
fully to take the picture.
*To cancel Fill-in flash mode, press the
flash mode button again or close the
lens barrier.
Attach the strap to the cameraaccording to the directions illustrated below.
Use of the
optional
Be sure the lens barrier is closed
before the camera is inserted into the case.
Q: Will the camera operate without film?
release if the barrier has been left open over 4 hours.
A: Even if there is no film in the camera, if the lens
Close and re-open the barrier once before shooting.
barrier is open, the shutter will release. Under low light
Q: The flash does not activate.
the flash will activate. If the lens barrier is closed, the
A: Check the flash mode.
camera will not operate; and if the flash is activated in
Q: How long does the battery last?
rapid succession, the camera may get warm. (In the
A: Since lithium batteries have extra long lives, you can
latter case, pause between shots.)
shoot approximately 20 rolls of 24-exp. film. Using a
Q: The camera will not operate. What shall I do?
flash will shorten the life of a battery by about 50%;
A: (1) Open the lens barrier fully. (2) Be sure the battery is
thus if you use the flash less frequently, the battery will
placed in the camera correctly and that the battery
last longer.
power isn't low. (3) The camera will not operate when
Q: The camera does not work in extremely cold weather.
the flash is recharging. (4) Be sure the subject is not
What should I do?
closer than the shooting distance. (5) The camera will
A: In low temperature conditions, batteries temporarily
not operate until the camera back has been opened af-
lose performance. Try to keep the camera warm.
ter the film has been rewound. (6) The shutter will not
Q: The pictures aren't sharp. What's wrong?
A: In the following examples, the camera's autofocus
mechanism may not function properly. Use the focuslock mechanism when taking pictures of:a. (1) Objects that reflect too much light (2) Blackobjects (3) Objects through glass windows or wirescreens (4) Subjects in which flames or smoke areincluded (5) Subjects in which the sun is part of thepicture.
b. Subjects in high - light situations, such as summer seashores or snowy mountains.
Q: Where can I buy lithium batteries?
A: At your local camera dealer or nearest Olympus
service center. When purchasing batteries, orderDuracell DL123A or Panasonic CR123A, or equivalent.
Care and storage
*Do not expose the camera to extreme heat
*Do not use organic solvents, thinner or benzine to
(over 40°C or 104°F) or to extreme cold
clean the camera.
(below -10°C or 14°F).
*Avoid high impact from bumping or dropping the
*Avoid sudden temperature change.
*Do not expose the camera to strong magnetic
*Do not expose the camera to rain shower and
*Do not apply excess force to the camera or its
*Never disassemble the camera; it contains a high-
voltage circuit.
*Do not rotate the camera once it is mounted on a
*Do not disassemble or expose batteries to excessive
tripod. Avoid opening the camera when it is
mounted on a tripod.
*In case of malfunctions, consult your nearest
*Do not touch the contact points inside the
Olympus dealer, or nearest Olympus service
Type: Fully automatic 35 mm autofocus lens-shutter camera
Selftimer: Electronic selftimer with 12-second delay (While
Film format: 35 mm standard DX coded film (24 x 36 mm)
pressing the self-timer button, press the shutter release
Lens: Olympus lens 35 mm F3.5, 3 elements in 3 groups
button to activate self-timer. Red LED turns ON)
Shutter: Programmed electronic shutter
Film speed range: Automatic setting with DX-coded film
Viewfinder: Active type viewfinder type 0.4X (with auto-
(ISO 50—3200). Actual setting at ISO 50, 100, 200,
focus frame, close-up correction marks, flash indicator,
400, 800, 1600 and 3200.
AF indicator).
Film loading: Automatic loading, (automatically advances to
Focusing: Active type autofocus system, focus lock possible.
first frame when camera back is closed)
Focusing range: 0.35 m (1.1 ft.)— (infinity)
Film advance: Automatic film winding.
Exposure control: Automatic exposure control with
Film rewind: Automatic rewinding (automatic rewind activa-
programmed electronic shutter. Automatic control range
tion at the end of film, automatic rewind stop), rewind
with ISO 100 film: EV 7.5 (F3.5, 1 /15 set) to EV 17
possible at any point with rewind button.
Flash: Built-in. Recycling time approx. 3 sec. (at normal
Exposure counter: Progressive type LCD panel
temperature). Flash range with color negative film:
ISO 100 film: 0.35 m (1.1 ft.) —3.5 m (11.5 ft.).
ISO 400 film: 0.35 m (1.1 ft.) —7 m (23 ft.).
Flash modes: AUTO (automatic flash activation in low light
and backlight), AUTO-S (automatic flash activation inlow light and backlight), OFF (no flash), and FILL-IN(forced activation).
Battery check: Display on LCD
Lens barrier: Sliding type (with release lock)
Power source: 3V lithium battery (DL123A, CR123A or
Dimensions: 117 (W) x 63 (H) x 37 (D) (4.6" x 2.5" x 1.4")
Weight: 170 g (6.0 oz.) (without battery)
*Specifications and design are subject to change without
**Specifications according to a DL123A/CR123A power
OLYMPUS OPTICAL CO., LTD.
San-Ei Building, 22-2, Nishi Shinjuku 1-chome, Shinjuku-ku, Tokyo, Japan. Tel. 03-3340-2211
OLYMPUS AMERICA INC.
Two Corporate Center Drive, Melvile, NY 11747-3157, U.S.A. Tel. 516-844-6000
OLYMPUS OPTICAL CO. (EUROPA) GMBH.
(Premises/Goods delivery) Wendenstrasse 14-16, 20097 Hamburg, Germany. Tel. 040-237730
(Letters) Postfach 10 49 08, 20034 Hamburg, Germany.
OLYMPUS OPTICAL CO (UK.) LTD.
2-8 Honduras Street, London EC1Y 0TX, United Kingdom. Tel. 0171-253-2772
Copyright OLYMPUS OPTICAL CO., LTD. (Tokyo)
PRINTED IN HONGKONG 0592 50MM
Source: http://www.fotoklikk.hu/sites/default/files/faces_files/olympus-stylus-angol.pdf
Support to the Health, Nutrition and Population Sector Programme in Bangladesh BMZ-No.: 2003 66 237 / 2005 70 424 Health Financing Component Baseline survey: to assess the existing capacity of human and other resources for health service delivery at all levels of the health care system in one upazila from each of 3
Osteoporos Int (2002) 13:353–357ß 2002 International Osteoporosis Foundation and National Osteoporosis Foundation Skeletal Status in Children, Adolescents and Young Adults with End-Stage Renal Failure Treated with Hemo- or Peritoneal Dialysis W. Pluskiewicz1, P. Adamczyk2, B. Drozdzowska3, K. Szprynger2, M. Szczepanska2, Z. Halaba4 andD. Karasek11Department and Clinic of Internal Diseases, Diabetology and Nephrology – Metabolic Bone Diseases Unit, 2Dialysis Division,Department of Pediatrics, Clinic of Nephrology, Endocrinology and Metabolic Disorders of Childhood, and 3Department andChair of Pathomorphology, Silesian School of Medicine in Katowice, Poland; and 4Outpatient Medical Care, Zabrze, Poland


